Monday, August 22, 2011

Miniature Monday Project: My Witch and Her Castle - Part 2

My castle room is progressing nicely!  Part 1 of this project can be found HERE.  I painted the foam to look like stone by using a series of color washes and sponged layers.


I wanted to make sure that there was no blue showing through.  My first step was to use a thin wash of burnt umber. I concentrated on each of the stone separations and any cracks I created.


I did another coat of the wash to make sure I had complete coverage.  Once that dried completely, I painted both pieces in burnt umber.  It is important to let your work dry in between coats so that the colors are blended properly.  You will be tempted to fuss with it, but don't.


Next I used a regular kitchen sponge cut into small pieces to layer my gray from dark to light.  I used Delta Ceramcoat in Dark Gray, Hammered Iron, Quaker Gray, Mudstone, and Sandstone.  Sponging randomly and allowing each coat to dry.

The floor has had a layer of lighter paint sponged on.  I snapped this photo so you could see the difference each layer makes.  I'm including a fireplace in my scene.  I applied the same paints and techniques to a resin fireplace I had in my stash.  Using the x-acto knife, I carved a niche out of the wall base and painted that with the hammered iron.


Once I was satisfied with the wall and fireplace, I used tacky glue and my clamps to adhere the fireplace to the wall.

Join me next week for Part 3.

Thanks for looking!

Monday, August 15, 2011

Miniature Monday Project: My Witch and Her Castle - Part 1

A few weeks ago, I attended the NYC Miniature Doll List Convention.  I took two classes that weekend.  The doll workshop was taught by Helena from Belgium http://www.dollsinminiature.com/.   Her work is amazing!
She came with beautifully prepared porcelain dolls and all of the materials needed to finish lovely witches. This one is mine, dressed and wigged with Helena’s careful guidance:
My doll was complete in class and once I got home, I couldn’t think of anything but creating a scene for her.
The first thing to decide on was the structure.  I have an obsession with glassed in terrariums and giant candle holders so I had the perfect one in mind for my witch!

It opens at the top, and the panels are sealed with glass.  I decided I would be using blue builder’s foam for the wall and floor.  Since I would be working outside of the structure, I first drew a pattern of the floor and wall panel, then cut that out of the builder’s foam.  This is what the foam looks like before I started the treatment:

Using an X-Acto knife and ruler, I carefully cut two inch wide by 1 inch tall blocks on the wall, and a more random pattern on the floor.  Once those were cut, I went in with a stylus to define the stones a bit more:


Join me for part 2 of this project – painting the foam to look like stones.
Thanks for looking!

Monday, August 8, 2011

Miniature Monday: That Ornament is Not For My Tree! Baby in a High Chair

Miniaturists are always on the lookout for innovative ways to use ordinary products.  Christmas time is especially exciting because we scour the stores for scale tree ornaments;  YES ornaments!
Last December, I came across a wonderful ornament of a bear in a high chair, “Baby’s First Christmas”, in my local drugstore.
  
Made out of sturdy but soft enough to cut plastic, the ornament was perfect 1/12th scale with amazing details.   I carefully removed the bear and his toys from the high chair with my X-Acto knife.  I then painted over “Baby’s First Christmas” with 2 coats of white acrylic paint.  I wasn’t worried about any rough spots I caused since the new miniature baby’s bowl and snacks would cover the imperfections. 
The result is a perfect high chair for my beautiful doll house baby.  The baby is hand sculpted from polymer clay and measures about 2 ½”.  The high chair is about 4” tall.
I purchased the baby from Miniature Artist Alicia Singleton.  You can find her on EBAY at http://myworld.ebay.com/alliebeandolls/ or on  ETSY at http://www.etsy.com/shop/alliebeandolls.  I absolutely love the detail in her work!
So keep a lookout for those unusual miniatures and thanks for looking!

Monday, July 25, 2011

Miniature Monday; Grandpa's Study

These lovely dolls are waiting for Granpa to tell them a story.  They are by talented doll artist Bonnie Justice.  You can find her here: http://bonniejustice.blogspot.com/


The room box measure 14" tall by 11" wide by 9" deep.  The walls are made from strips of wood cut to create the panels and then stained.  The windows are super thin strips of leading that were cut and placed individually on a piece of acetate to make the window panes.  The old glass look is made from carefully dabbing clear stained glass paint in between the lead strips.

Thanks for looking!

Monday, May 16, 2011

Miniature Monday - Wooden Vase Shop

This shop is 1/12th scale and measures 12"wide by 11"high by 9" deep.  All of the tiny vases are hand turned out of a variety of wood.  I purchase them everywhere I go.


The beautiful doll is made by IGMA Artist Gisele Hanson. The lovely painting in the background was hand done (with itty bitty brushes and acrylic paint) by my friend Heidi Gordon.


YES, that cat has fur! His name is Fred, and he's the store's guard cat.  He was sculpted and painted by Linda, an amazing miniature artist that I purchase from on EBAY.  Check her out - her seller's ID is linda060060.  I wove those baskets with waxed linen thread and stained them walnut.

The potted plant on the shelf was a purchase from Grapevine Miniatures.

Thanks for looking!

Monday, April 25, 2011

Miniature Monday - Private Chapel

Yesterday, my family and I celebrated Easter.  That made me think about today's project, a diorama made a while back when I was practicing "stone making."  It's a private chapel in a castle, just for the Lord and Lady.


The box is constructed from 1/4" plywood.  I made the walls and floor by covering them with spackle, and once dry, I carved out each stone.  I then painted and distressed them to look like stone.


The altar is wood and cardstock painted to look like stone.  The candles on the altar are made from polymer clay.  I made each prie dieu (kneelers) with balsa wood stained walnut and a bit of scrapbooking velvet for the upholstery.  I must have made 5 of them before I was pleased with the result!

The mural is a printout. I framed it with wood and painted the wood to look like stone.

The finished piece is closed with an 11X14 purchased frame.


If you have any questions, please feel free to contact me.  Thanks so much for looking!

Monday, April 4, 2011

Miniature Monday - Two's Company Dolls

Last Fall I happened upon a wonderful Mother/ Daughter team of doll artists;  Jennifer and Elizabeth Yankowski.  Their official name is Two's Company and you can find their blog here.

Their attention to detail is incredible. Tiny folds, tiny accessories, I fell in love.

The way the dolls are dressed and posed tell a story:

The boy is wearing leather boots that are laced up perfectly.  He came with the rooster and the handmade cage.
These two ladies have snuck out for a drink:


Though sold separately, I couldn't resist pairing them. The smiling maid came with her own bottle and a beautifully made duster.  The other so good as the "lookout".

Thanks for looking!

Monday, March 21, 2011

Miniature Monday - Venetian Palazzo!

Welcome to Miniature Monday! Today's feature is another favorite of mine.  I attended Molly Cromwell's Sturbridge Miniature Festival.  I had a blast shopping and I signed up for the 4 day Venetian Palazzo with Bluette.

The furniture is all made by Bespaq.  They are beautifully detailed pieces.  I used  painting techniques to make the table tops look like marble and the furniture is painted gold with Ceramcoat Metallics.  The amazing flower arrangements are handcrafted by Paula Gilhooley.

The hallway, 2nd floor landing and terrace give the illusion that the space continues.  The chandelier and wrought iron on the landing are both made by Miniature Artist J. Getzan.  I was having a hard time deciding on more accessories, so I've left the scene alone.  As I travel to different miniature shows, I often find pieces that work and I add them.

Thanks for looking!

Friday, March 18, 2011

First Blog Giveaway Winner!

Hello everyone and THANK YOU for participating.  All of the lovely comments truly made my heart soar.

As directed by my wonderful Ustream viewers, I went to Random.org, plugged everyone's name that left a comment into a list and hit ENTER.  Here are the results:


Congratulations to GodsMixedMediaGirl, You are the WINNER!!!!!

Please e-mail me your information and I will send you your prize:

Again, thank you all for participating.  This was so much fun, I will be doing it again.

As always, thanks for looking!

Tuesday, March 8, 2011

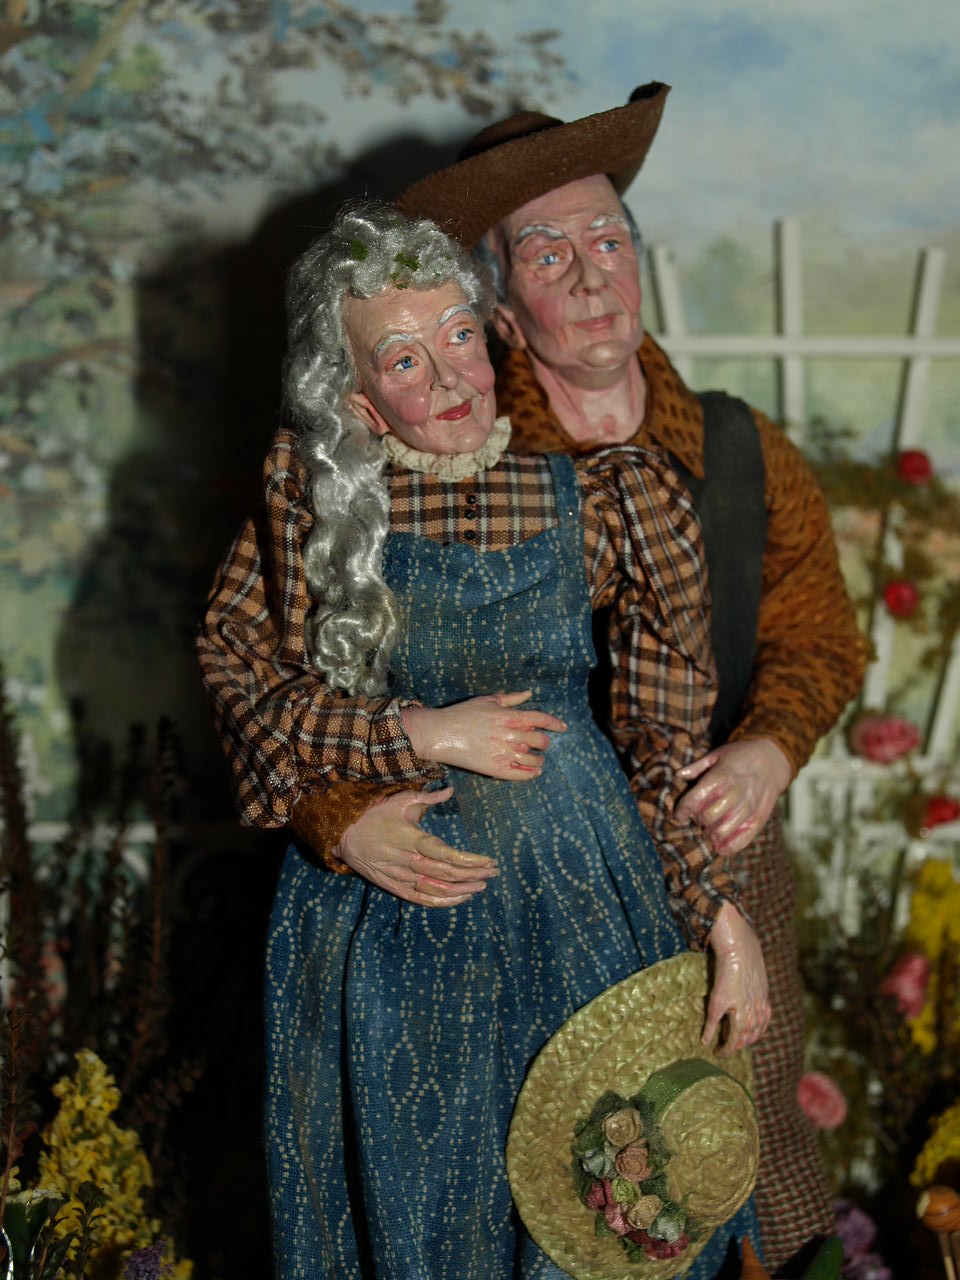
Miniature Monday - The Farmer and his Wife

THANK YOU for all of your wonderful comments on my FIRST blog giveaway.  I am so very grateful for the encouragement and I'm super excited to see who wins next week!

Today's miniature scene features a very talented Doll Artisan,  Marcia Backstrom.  I was lucky enough to win this work of art at an auction. 


The Farmer and his Wife.  Still in love after all these years, surrounded by nature.  Looking at them makes me so happy.  I know, I'm a romantic fool!


Marcia's dolls are amazing.  The age lines in their faces, realistic features, fingers and the tiny details in the clothing.

The scene is 1/12th scale.  To give you an idea of the size, that's my hand next to the dolls.  Amazing isn't it?

Check out Marcia's Website and let me know if you have any questions.

Thanks for looking!